Showing posts with label Jewellery. Show all posts

Monday, 3 October 2016

Enamelling Weekend Workshop

 
It's only a few weeks to go now until our residential enamelling weekend in November!! We still have a couple of spaces on this if anyone else wants to join us. It is going to be a fun time with workshop sessions through from Friday afternoon to Sunday afternoon.
 
 
If you've ever wanted to learn more tips and techniques for working with silver clay and how to use enamels to add lovely vibrant colours to your work then don't miss out!!!
 
This workshop will be packed with great info and ideas for creating your own textures to enamel onto, adding stones to fire in place, decorating the back of your pieces and even adding super extra little finishing details like these fun little snakes on the side of the piece below.
 
 
The cost of this workshop includes your hotel stay and food plus you get an amazing 25g of Art Clay Silver to create with! All that for only £399 means it really is an excellent value weekend.
 
We will all eat together through the weekend so it's a chance for everyone to make new friends as well as learning new techniques. There is also a kit fee of £16 and as part of your kit you will get a range enamel colours ready prepared by me to use on the workshop and you get to take them home with you afterwards so you will be all set to carry on your enamelling adventure at home :D
 
You'll find all the details in this brochure :D


 This is the program for the weekend. As you can see it will be action packed with never a dull moment! ;)
If you are in Europe you'll find Folkestone is ideally situated right by the Channel Tunnel and there are also regular trains from London that only take around an hour.
 
I'm really looking forward to seeing old friends and new there :) If you have any questions about it do email me!!
 
Have fun!
 
Joy x


Tuesday, 16 August 2016

Testing Art Clay Silver 950 Part 2

Part 2 of my Art Clay Silver 950 testing. Don't worry, there won't be a part 3 ;)
 
This will make a lot more sense if you have read Part 1 first, and if you've done that you will also know it is probably a good idea to grab a cup of tea before you start reading this time! Yes, it could be another long post! ;)
 
At the end of the last post I showed you two enamelled pieces. One was made out of AC950 (on the right) and depletion gilded. The one on the left was a circular piece of AC999 attached to a backing of AC950 and the two were fired together. I've now patinated these using Liver of Sulphur to bring up the textures. The LOS worked just fine, exactly as I would expect it to. Here they are all done. I love to patinate most things as it gives the textures definition and seems to make the enamel colours more vibrant :)
 
 
As I mentioned in the last blog post there is a difference between the shrinkage of AC950 and AC999. I've been trying to get a photo showing the slight doming on the piece on the left. As I've failed I decided to try a short video clip. I hope you might be able to see the domed effect in the centre of the back in this.
 

Next I made two more rings to see if the shrinkage seemed fairly consistent and also to try a few different techniques.
 
The first one is...um...a bit strange really! Why? Well I was using up the last bits of clay :D I forgot to take any process photos on this one so you'll have to stay with me here on a description.
 
 
I wanted to see how well the clay moulded. I twisted 2 strands of 1mm wire together and pressed it into two part moulding compound to make a long thin mould that I could use for a ring band. The clay moulded really well and cleanly. Then I added the front decoration. It looks kind of weird because it was all the bits I had left from all the other things I made. I'd made some tiny balls with little bits of clay and also I had two pieces left over for stone settings. I was going to use them on the first ring but changed my mind. So I set the two small barrel shapes with 2mm lab sapphires. I rolled out a tiny piece of clay .25mm (1 card) thick and once dry I added the ten tiny balls using water to join them. Once that piece was dry I sanded the tops off the balls to make that little piece in the middle.

Everything was joined using water only. After firing as per schedule I polished the ring and added some gold. Whenever I do keum boo I always totally polish the piece first then do the keum boo. The gold foil took really easily and without any issues.

Did I mention this was a tiny ring??? Actually it is a UK size N so perfectly wearable, just very thin!! Shrinkage was consistent with the first ring I made at 7 UK sizes. (As a side note I was amused to realise yet again I had created something vaguely bird like!!! or maybe I just see birds everywhere :D )


The third ring I made was more the sort of thing I would make normally. I started out with a snake of clay and then rolled it flat to 1.5mm (6 cards). I joined it into a flat band and once dry I carved it using a graver. I went with a quick simple starburst design to see how it felt. It carved very smoothly and cleanly. Lovely to work with!

 
Next I made a topper. I rolled out clay and textured a circle on both sides to .75mm (3 cards) thick. This is thinner than I would ever use in AC999 on a ring. I domed the circle by forming it over a 13mm bead to dry. Once dry I filed the edges to give a nice serrated look that went with the radiating design I had used.

 
I also filed the edges of the ring band.

 
The stone setting was a little piece I had pre-made in AC999. It was set with a 3mm lab ruby cab. I was interested to see how well the two clays would go together (and I was running short of clay to make a setting in AC950!). I used water to wet both parts and then joined them. It made a very solid join.

 
The topper was attached to the ring band using AC999 syringe. As I had used water only to join the toppers on my other two rings I wanted to see how this worked.

 
I fired the ring to schedule but took it out the kiln hot and placed it on one side to cool. The AC950 polished up very nicely. For this ring I used Black Max to patinate.

 
I was very pleased with the result. Again shrinkage was 7 UK sizes. I made this at a UK size X and it shrank to a UK size Q. After firing there was a certain amount of distortion, but that was very easy to correct on a ring mandrel, and because the fired silver is much harder I found there was less chance of marking it. The domed part held it shape nicely.
 

Finally I made one more piece to enamel. My other pieces had been more tests really so I wanted to make something that would show the colours better. I opted for one of my small butterfly designs.
 
I actually think the AC950 refines up even better than AC999 with baby wipes. Here is the dried butterfly before and after refining. The refining took me about 5 minutes, so very quick and easy.


This piece was textured to 1mm thick. Even though AC950 is stronger than AC999, for enamelling I would not make pieces any thinner. Enamel will crack on very thin silver unless you counter enamel the back due the stresses of the glass enamel on the silver. I never counter enamel as I always decorate the backs of things. For this little piece I stamped out one of my Joy logos. The AC950 took an impression from the stamp very crisply. I attached a piece of fine silver wire to the back of the piece using AC999 syringe to join it all.


This piece was fired to schedule at the same time as the previous ring. After firing I depletion gilded the piece until it was very white. Then I re-polished it and enamelled it.
 
And here it is...a rainbow butterfly!!!


So what conclusions did I draw from all this testing...
 
First of all - I love this clay!
 
 
Will I use it all the time?
No.
I'll still use AC999 for a lot of things. Depletion gilding works really well on AC950, but it does take extra time. If a piece needs extra strength I'll go with AC950 and put that extra time in if it is a piece to be enamelled. For rings I will definitely go over to AC950. If I am making something where the difference in strength will not be a major issue I'll stick with AC999.
 
For teaching I will most likely mainly stick to AC999 because of the shorter firing schedule, but there will be some things that I'll go over to AC950 for.
 
I'm  delighted to have had a chance to test this clay out - thank you Metal Clay Ltd!! I'm looking forward to the release date at the start of September so I can do more playing. I have lots of ideas in mind that I would not make using AC999 :)
 
If you use silver clay I recommend you give this a whirl and see what you think!!
 
Have fun!
 
Joy x


Saturday, 17 October 2015

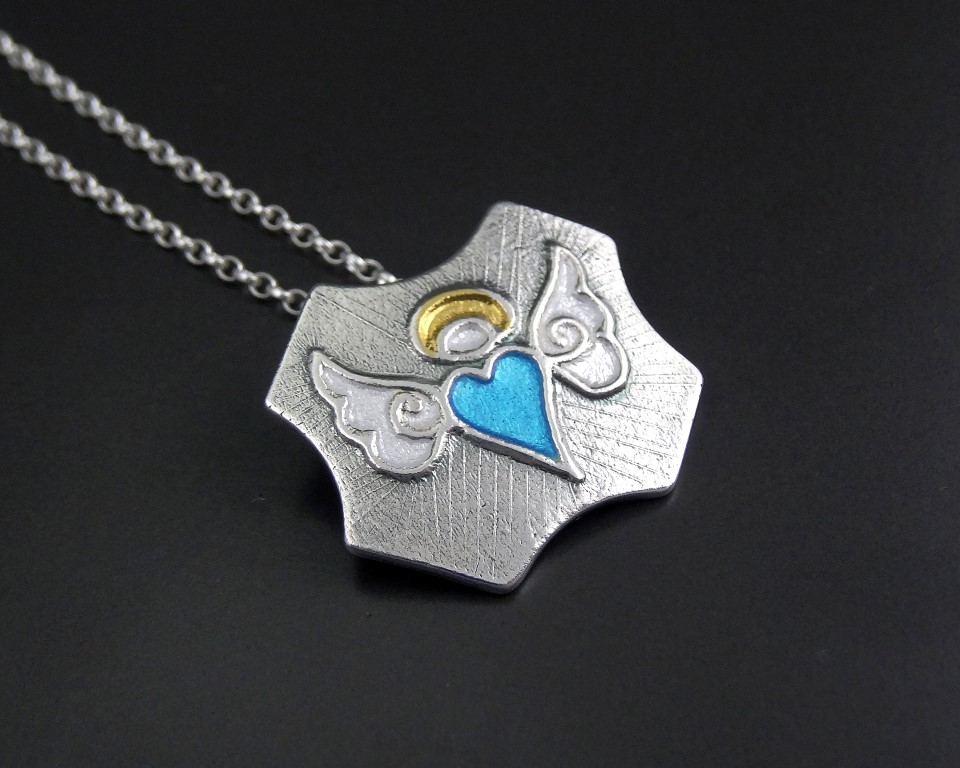
37/52 Joyful Angels


I know it still October, and I hate to even mention it, but I've been thinking ahead to Christmas! A while ago I designed an angel pendant and I wanted to revisit it to make some more for a Christmas photo that I needed to do now.

I decided to make three angels in three different colours - then I hit much indecision as to what shape to make each pendant! So I went for three different shapes as well! :)

I actually still can't decide which I like best. Do let me know your thoughts on it.

The first angel has a lovely turquoise blue heart...and I'm not sure what this shape is called!


I used one of my own textures on the back of each pendant and this one also has a nice sparkly blue zircon stone.
 

The next angel is on a heart shape pendant...and of course it had to have a red heart as well :)
 

The back of this one has a nice sparkly red cz.
 

Finally the third angel has a vibrant green heart and is on a shield shape pendant.


 I decided to go with a lovely pale yellow citrine cz on the back of this one.


Each angel has 24k gold on their halos which I fused to the silver using the keum boo technique. There is a very subtle radiating pattern in the silver around each angel.  

I've now taken the special photos that I wanted so I've listed the angels on website ;)

Do let me know what you think by leaving a comment :)

Have fun!

Joy x 

PS I'm on catch up - two more blog posts coming soon! 
PPS I now have more of my textures back in stock on my website!


Tuesday, 18 August 2015

28/52 Rainbow Ripple

For this challenge piece I've been working on creating unique textures in metal clay for enamelling onto. I had a lot of fun with this! 

I started out with a few practise pieces to see how the idea looked. I liked the effect in this one below (OK so don't even ask why it is that weird shape - that's what happens when you re-purpose something you broke on another occasion ;) )


For this piece I went with more of a swirling design. It is fine silver with enamel and set with 2mm orange CZs and 3mm black spinel stones all around it.


On the back I added decoration with silver shapes. The centre round has one of my own textures on it (and I now have a heap of my own textures sitting in front of me waiting to be listed on my website!! :) ).


Once it was fired and finished I made a handmade silver chain to go with it. Each link has a hematite bead which I thought blended in with the black spinel well. 

I've had these hematite beads for ages, but they are magnetic and a right pain to try to use! So following on from my success at demagnetising steel shot a few weeks ago I placed the beads onto a ceramic pad and covered them with some ceramic fibre, then put them into a preheated kiln at 800c for 5 minutes. I took them straight out and left them to cool with the ceramic fibre over them and yes, they were no longer magnetised!! Yay!! 

I've already made a second piece along these lines and I'll be posting it very soon!! :D

Have fun!

Joy x


Sunday, 26 July 2015

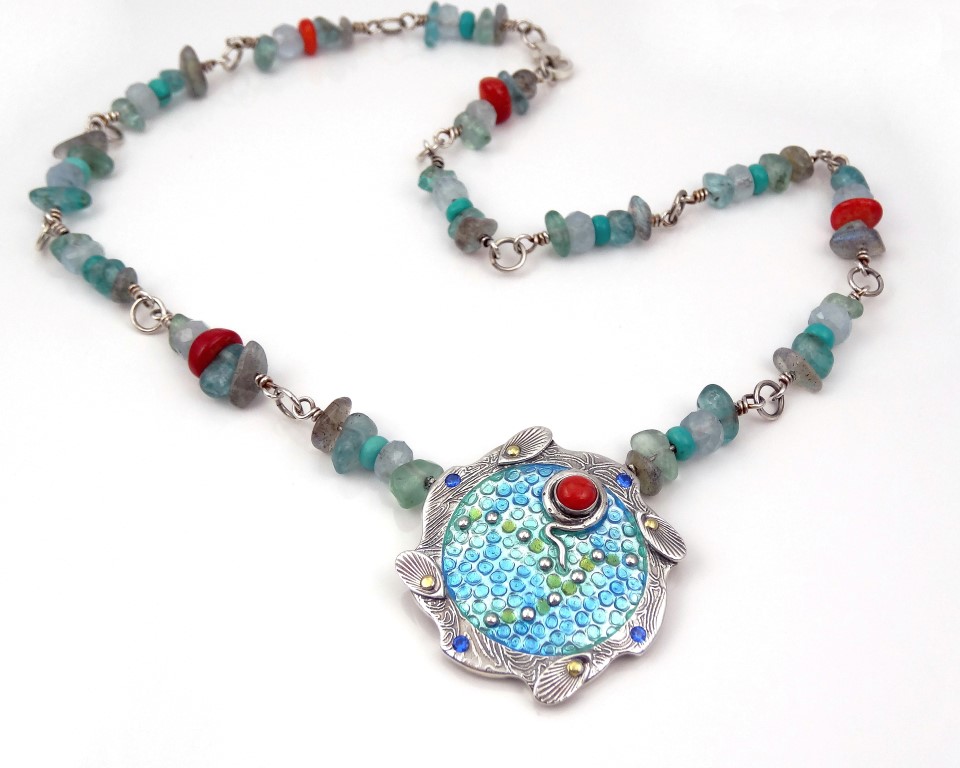
23/52 Aquaocity


I had fun making this piece! 

I've been trying out some new techniques for making a surface to enamel onto adding textured areas by hand. I'm liking the result and have another piece underway to see where it all takes me :) 

The little shell shapes have 24k gold added onto them, and there is also gold under some of the enamel. The little blue stones are 2mm lab sapphires and the pendant is set with a 5mm sea bamboo coral cabochon.

The back is also a change for me as I didn't add my normal style of bail but went for two half loops to attach the chain to.  


I wanted to make a chain to complement the pendant, but I searched through my bead stash and really didn't have anything I thought would go with it. In my mind I knew I wanted translucent watery look in the stones. So a trip to my local stone shop Stone Corner was in order. It is a wonderful shop, the problem is there is always too much to distract me!! True to form I returned with beads for this project...and things for a couple of future ones I haven't even thought of yet!!! ;)


I love being able to visit a local shop to buy, I went thinking I wanted aquamarine, but when I put the pendant by them they really didn't work on their own, they are the pale blue ones.

After much rummaging through bags of beads (and a great deal of patience by the shop owners!!!! :) ) I eventually ended up with a mix of aquamarine, apatite, labradorite, howlite turquoise and sea bamboo coral. 

Then  it was beading time! This was the end result.

The chain has more sparkle than I can capture with the camera, and the little labradorite chips have lovely flashes of colour too. 

All that was left was to think up a watery name for it.  

So this is Aquaocity :D

Have fun!

Joy x


Monday, 13 July 2015

20/52 Stud Earrings!!

OK, time to catch up on my challenge and my blog posts. So here we go, they all be along in time, albeit they might be in the wrong order!! ;)

Stud earrings - in the past I've never really made them!

Why? Well firstly I don't wear them myself. I used to in the dim and distant past. Before I ever started making jewellery I only ever wore stud earrings. But I also only ever wore gold back in those days as well! :)

Once I started making jewellery I changed to wearing dangles as I liked making them, and generally the ones I make are a bit larger so I feel I have more design scope. But people always ask me for studs. So recently I decided I really should start to make them.


I made a batch of silver flowers with 24k gold added by Keum Boo method, and then started on some with stones set into them. I like the more rustic stone set ones, and they seem slightly medieval to me, a style I always like!! The cabochons do glow nicely on the ones with the stones fired in place. the turquoise cabs are 3mm and are bezel set after firing. A bit on the fiddly side but I like the result!!

At my show last weekend I sold some straight off :)
So I guess I'll be making a lot more of them from now on! Time to try lots of new designs! :D

Have fun!!

Joy

Friday, 9 March 2012

A Colourful Life


This is why I so love colours and textures!......

Tomorrow is my first fair of the year. It is only a small one in Bexhill on Sea but it should be fun. It is organised by a local community association and as well as the craft stands they are doing a big fair trade promotion with all the refreshments side so it should be fun.

I have been making more stock as I was a bit low on the smaller items. Above is a photo of pieces made in the plain silver.  Add a bit of enamel and a liver of sulphur patina and hey presto!

Now doesn't that just brighten up your life? :)


If you are interested in learning how to zing up your jewellery with some colour check out my enamelling workshops. There is a link at the top of my blog and I would love to meet you.

I have more exciting news coming soon about classes as well.

Watch this space.... :)
Related Posts with Thumbnails