Showing posts with label ring making. Show all posts

Sunday, 29 December 2019

Ring a Month 2019 - December


This is my ring for December for the Ring a Month Challenge 2019.

This is 
Jimbug © Joy Funnell

The theme for the month was Creatures.

This is quite a long winded post - you have been warned!! 😉

When I started on this challenge in January 2019 one of my personal things was to try to use left over elements that I have already laying around. I've managed this with varying success over the months. This month I'm pleased to say that apart from the ring band all the elements were pre-made pieces of clay I had laying around 😀

There's a little story to the main element that sparked my idea for this ring. In November I was teaching a 1-2-1 workshop and we were making Christmas decorations. The main thing to be made was a teddy bear (which was very successful I would add), but during the day I was playing with one or two other ideas my workshop attendee had had while she was working on teddy. One was a snowdrop. I made a little template up and cut out a piece of textured clay to form into a flower shape. In the process of mucking about with it I laid it down and we both said - oh look - a cricket!! 😂

I left it on one side to dry as the shape was quite nice. 

When the theme for the December ring was announced I immediately thought of the little bug shape. 


All year through this challenge I've wanted to do at least one ring with a cabochon (cab) in it. 

I've had this ammolite cab for ages - it has gorgeous colours but the finish is not top quality - there again I was given it as a freebie with some other stones I bought so I can't complain 😉 

I realised it was a perfect size and shape for my little bug so I set about creating!!


In order to fit the cab into the wing shapes so it could be the body of the bug the first thing I did was to remove the bottom 'petal'. Then I found an old piece of textured clay I could make a base from. It was quite big...


...and had been used for practising creating textures on various workshops in the past on the reverse!!! As that side wouldn't be seen that didn't matter. I laid the wings onto it, drew out the rough shape I wanted and then scored the clay. 


After scoring it was easy to gently bend the clay and break away all the excess, much quicker than cutting it back or filing 😊


I fixed the wings to the new base and dried it...


...and then added the original 'petal' base plate back in as that would be the support for the cab to sit on.


From my box of dried bits of clay I found two pieces for eyes and some curly bits!! lol


These were added and my little Jimbug was starting to come to life 😊


The textured surface of the head suggested a natural little smiling mouth so I just went with it and emphasised it more. 

He was very cute sitting on my fingers 😂


Now I needed a ring band. I didn't have one made in my size so I had a good think of something different I could do. I rolled out a snake of clay using the Rollmakers (if you previously missed seeing what Rollmakers are check out this blog post 😉).
After rolling the snake I then flattened it to a thickness of 2mm (8 cards). It gave a nice effect and I'll use this again. I wrapped it onto a ring mandrel and joined the ends. 


I neatened the join and then added little Jimbug onto the band.


Once he was nice and dry he was already for firing. I like to fire rings with large topper elements standing upright supported by a bit of fibre wool.


Once he was fired and cooled I used pliers to adjust his wings so the cab would easily slide into place. 


I polished up the silver and patinated it to give a nice contrast in the textures and make them stand out. 
 

Finally I set the Ammolite cab into place. To be sure it would be really safe I used a little glue under it and then I gently bent the wings in tightly to hold the cab in place. I don't think the cab would of fallen out without the glue but it would of wobbled a bit and I wanted it to be nice and firmly in position. 

And so Jimbug was finally ready!!


Depending on the angle of the light the Ammolite cab shines reds, yellows and greens. 


I've made a little video of him to give you a better idea of the colours in the cab 😀


So that's it - the twelfth ring!!! 

I've really enjoyed this challenge and I've definitely made some pieces I would never of dreamt of back in January.

I was thinking of what to do next year and a couple of weeks ago (after I had already started making this piece) I had an idea to start a challenge to
Set a Cab a Month in 2020.

I've created a Facebook group for that and asked if anyone wanted to join me - and we already have nearly 250 members!! Wonderful 😊

This ring is the perfect crossover from making a Ring a Month to getting ready to start my Setting a Cab a Month challenge. Please do join in next years challenge if you want to :D

So until next time...
Have Fun!!

Joy x


Wednesday, 27 November 2019

Ring a Month 2019 - November


This is my November ring for the Ring a Month Challenge 2019.

The theme for the month was Gemstones.

This is 
Rainbow Doughnuts 😁

Why Doughnuts I hear you ask??
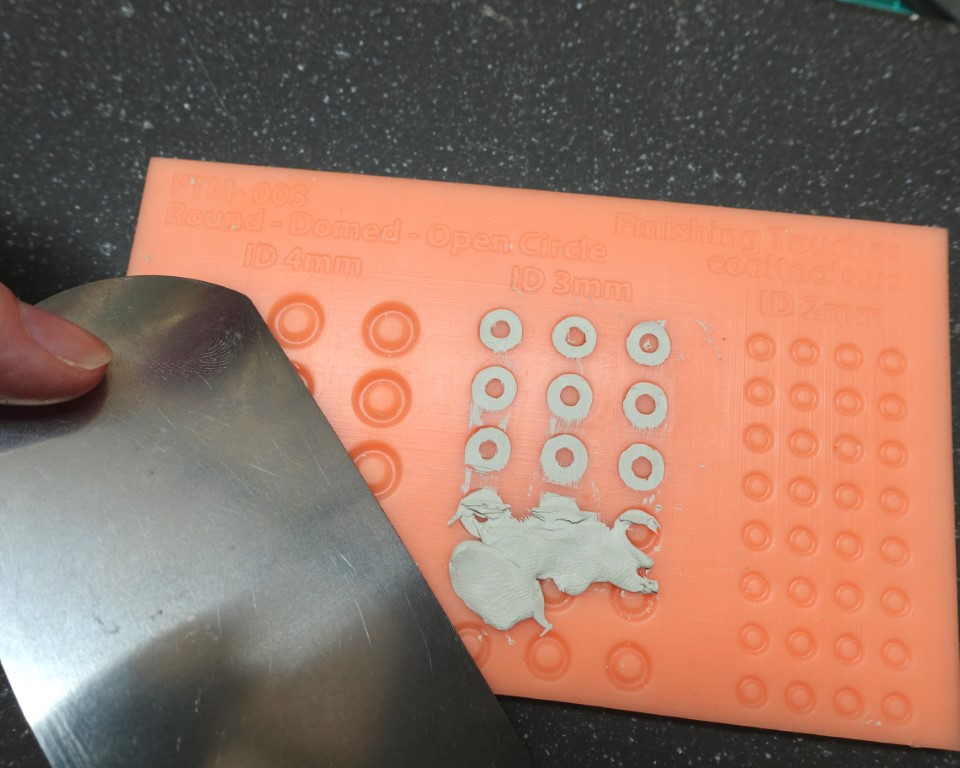
Well I'd bought some super whizzy new moulds for making tiny embellishments and this particular mould makes little open circles. In talking to someone about them they said I could make lots of baby doughnuts!! lol It seemed like a good name to use!!😉

The moulds are made by Cool Tools in the USA (so they are molds and not moulds - lol) and are available here in the UK from Metal Clay Ltd  (at which point they become moulds!!!). 😂

First of all I made a load of little embellishments using Art Clay Silver 999. The clay is pressed into the mould and left to dry. Then the little shapes can be popped out. 


Then I made a flat ring band. As I hadn't really worked out my design in advance I went with a very wide band...


...then I played around with the doughnuts until I found a design I liked. Of course if I had done this part first I could of made the band the right size to start with, but hey, why make life easy 😉


I carefully measured up and worked out that the design should fit quite nicely around the ring so then I started to add the doughnuts to the flat band. I used water to join them...


...and continued around the ring - and it worked out right!! Phew! 😌


Then I started to remove all the excess silver clay...


...working around both edges of the ring first with a scalpel.


I used files and baby wipes to refine the design close to the edges of the doughnuts and neaten it all up. 


Next was choosing which stone colours to use. I LOVE this bit!!! 😊 Should I go with the small stones in differing colour pairs or..


....the same in each pair. I liked this second option better. The stones are 2mm and 4mm and are a mix of lab grown, nano and CZs. They are all fire-able. 


I drilled out the centre of each doughnut and used stone setting burrs to make the seat for each stone.


Arguably I could of made this ring using my usual method of creating stone settings, but I like that each setting is rounded on the top so this does give a different look. 

I set all the stones into place


Lots of different colour combos


all around the band 😊


I was pleased with the end result. 


Turned out it wasn't the easiest ring to photograph though!! lol


So now we have made 11 of the 12 rings for the year long challenge.

Only 1 ring left to go!!!


Have fun!

Joy x

Tuesday, 23 July 2019

Ring a Month 2019 - July


Here's my ring for July.

The theme for the month was Movement.

I started out thinking about some kind of mechanical movement. A spinner ring maybe? Well I make those and teach them anyway so that wasn't going to be much of a challenge. I couldn't think of any other kind of movement that I wanted to try but at the time I was busy making Tiny Critters!! Aha...a ring with some kind of creature that showed movement could be fun to make! 

Then it was a case of what sort of critter. The animal had to be showing movement so I thought of a hare at full stretch with it's ears back. The legs could be attached to the ring shank. 
Now at this point things got a bit more interesting.... as always I started to Google images to give myself ideas for the shape of the creature...and you know what...I couldn't find any hares running full stretch with their ears back! There were loads of statues and paintings in that pose, but in the photos the ears are upright. Now seriously...that was not going to make a very good design for a ring with the ears stuck straight upwards was it!! lol 😂 Can you just imagine!!! 😉

Then I saw a photo of a hare jumping down with it's head raised looking up so that it's ears were more backwards towards the body - perfect. I would apply a little artistic licence as to how far back the ears went (so they touched the body 😉) and I was good to start making😊

In my quest to use up some part made pieces on this challenge I started out with a part made D ring that I'd been making earlier in the month while teaching. 


I got to work with a file adapting the shape and roughing it up a bit.


My little hare needed something to jump off so I made a little log and fixed it to the ring band...


...and then added some grass like texture to the top part of the ring. 


Next I made my little hare. Here he is sort of finished, but I didn't think he was quite right, then I realised I'd made his head a bit too long...


...so I carved it back a bit and reshaped it, then re-carved the nose onto it. This worked much better to me. So I attached him onto the ring 😊


All in all I was very happy with him, BUT to be fair it was not going to be the most practical ring to wear!!! I liked the idea that he could also be admired as an ornament if he wasn't being worn, so I made a little stand. 


It was very simply made from three pieces. I thought the curved legs would echo the shape of the ring shank and the top texture repeats the grass on the ring. 


The ring just sits nicely into the slot...


...and the ring can sit upright or at a slight angle so you can see the hare better. 


I then fired the ring and the stand and finished them off 😊


Now...what to name the ring. I enjoyed making this one so much I decided on

Jumping for Joy

😂

This wasn't the all that easy to get a good photo of, so I decided to make a little video of the ring too :D 


I've really enjoyed this months challenge and can't wait to see what August will bring us!!

Until then...

Have fun!!

Joy x

Related Posts with Thumbnails