Showing posts with label Ring a Month 2019. Show all posts

Wednesday, 27 November 2019

Ring a Month 2019 - November


This is my November ring for the Ring a Month Challenge 2019.

The theme for the month was Gemstones.

This is 
Rainbow Doughnuts 😁

Why Doughnuts I hear you ask??
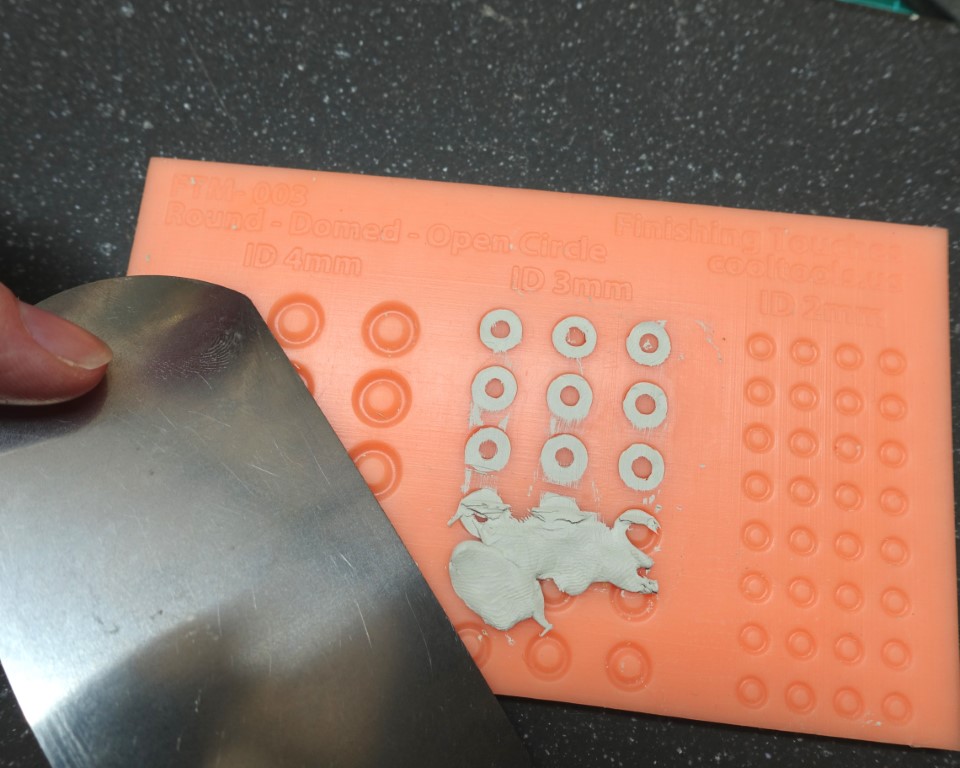
Well I'd bought some super whizzy new moulds for making tiny embellishments and this particular mould makes little open circles. In talking to someone about them they said I could make lots of baby doughnuts!! lol It seemed like a good name to use!!πŸ˜‰

The moulds are made by Cool Tools in the USA (so they are molds and not moulds - lol) and are available here in the UK from Metal Clay Ltd  (at which point they become moulds!!!). πŸ˜‚

First of all I made a load of little embellishments using Art Clay Silver 999. The clay is pressed into the mould and left to dry. Then the little shapes can be popped out. 


Then I made a flat ring band. As I hadn't really worked out my design in advance I went with a very wide band...


...then I played around with the doughnuts until I found a design I liked. Of course if I had done this part first I could of made the band the right size to start with, but hey, why make life easy πŸ˜‰


I carefully measured up and worked out that the design should fit quite nicely around the ring so then I started to add the doughnuts to the flat band. I used water to join them...


...and continued around the ring - and it worked out right!! Phew! 😌


Then I started to remove all the excess silver clay...


...working around both edges of the ring first with a scalpel.


I used files and baby wipes to refine the design close to the edges of the doughnuts and neaten it all up. 


Next was choosing which stone colours to use. I LOVE this bit!!! 😊 Should I go with the small stones in differing colour pairs or..


....the same in each pair. I liked this second option better. The stones are 2mm and 4mm and are a mix of lab grown, nano and CZs. They are all fire-able. 


I drilled out the centre of each doughnut and used stone setting burrs to make the seat for each stone.


Arguably I could of made this ring using my usual method of creating stone settings, but I like that each setting is rounded on the top so this does give a different look. 

I set all the stones into place


Lots of different colour combos


all around the band 😊


I was pleased with the end result. 


Turned out it wasn't the easiest ring to photograph though!! lol


So now we have made 11 of the 12 rings for the year long challenge.

Only 1 ring left to go!!!


Have fun!

Joy x

Friday, 1 November 2019

Ring a Month 2019 - October


This is my ring for the Ring a Month Challenge 2019
Sakura

The theme for October was
Inspired by the Seasons 

I decided to go with a Spring themed ring πŸ˜€ 

This month I was running it really close on time - I only started my ring on the 31st but I did manage to get some photos posted before the end of the day!! lol

First I made the topper for the ring. The lovely pink CZ pear shaped stones are 5mm x 3mm so quite tiny. 


As the ring has a Japanese feel to it I went with a weave pattern on my textured band that I thought looked like it went with it!! πŸ˜‰


Then I carved the band so it had wavy edges.


To add more colour and sparkle I added some 2mm stones, and then I carved the edges of the topper to match in with the ring band πŸ˜ƒ


To join the two pieces together I used a element made using the Roll Makers that I already had made. 


Finally I added a little more detail into the main blossom flower to bring the stones together more. 


Then the ring was ready to be fired!!!


I finished the ring off with more of a satin texture which I like the look of. It's not a finish that I use much but maybe I'll use it more now as I liked the effect it gave. 

One of the things I was interested to see was how the surface went during firing where the blossom was. It domed very slightly around the stones and gave a good effect.


I was very happy with how this ring turned out!!! πŸ˜€ 


I think there are some nice techniques in this ring that are handy to learn including how to set round and odd shaped stones, so I'll be teaching this workshop next year at Creative Glass in Rochester, UK, on Friday 7th February 2020. 

Bookings will be open next week for the workshop!! :D

That's ten rings down in the year long challenge and only two left to do!!

Until next time...

Have fun!!

Joy x


Saturday, 31 August 2019

Ring a Month 2019 - August


Here is my ring for August.

The theme for the month was
'Under the Sea'

This is Cephalopodicus Funnelli πŸ˜‰

I had a lot of fun making this ring. As soon as I saw the theme I had an idea as I'd also just acquired a new tool and I was keen to play!!! 

So I started out making the band for the ring which was a tapered snake of textured clay.


Then I drilled out the larger end to make the shell hollow. This was so the actual creature could live inside it's shell πŸ˜„ 


Next I added the arms using little textured snakes of clay. Most cephalopods had 10 arms, so 10 it was. I fitted each one into the shell and squiggled them around a bit...


...then I made some little tiny ammonites to snuggle up. I used a stone setting burr to make a seat for a 3mm stone in one of them...


...and it was cuddled up in the arms.


Then I set the stone in place and also added a nice green eye. Unlike most cephalopods Cephalopodicus Funnelli is fairly unusual in that it only has one eye πŸ˜‚ 


Finally I added another little ammonite on the side of the shell.


Then the ring was all ready for firing. 

Here's a little video of it before it was fired.  


After firing the ring was polished up and patinated to bring up all the nice textures. 


I was lucky that I manged to find an actual photo of Cephalopodicus Funnelli in the sea to photograph my ring beside!! Although it isn't to scale!! πŸ˜‰πŸ˜‚


So if you are a metal clayer then you are probably wondering by now what the new tool was that I used to make this ring? 

Well I am super excited by these and I've made a video showing you the tools in action because I'm absolutely loving using them.

The good news is that they'll be in stock at Metal Clay Ltd in the very near future!!! 


I've very much enjoyed the Ring a Month 2019 challenge this month. 

I do hope you enjoy my videos!! ;) 

Until next time...

Have fun!

Joy x


Tuesday, 23 July 2019

Ring a Month 2019 - July


Here's my ring for July.

The theme for the month was Movement.

I started out thinking about some kind of mechanical movement. A spinner ring maybe? Well I make those and teach them anyway so that wasn't going to be much of a challenge. I couldn't think of any other kind of movement that I wanted to try but at the time I was busy making Tiny Critters!! Aha...a ring with some kind of creature that showed movement could be fun to make! 

Then it was a case of what sort of critter. The animal had to be showing movement so I thought of a hare at full stretch with it's ears back. The legs could be attached to the ring shank. 
Now at this point things got a bit more interesting.... as always I started to Google images to give myself ideas for the shape of the creature...and you know what...I couldn't find any hares running full stretch with their ears back! There were loads of statues and paintings in that pose, but in the photos the ears are upright. Now seriously...that was not going to make a very good design for a ring with the ears stuck straight upwards was it!! lol πŸ˜‚ Can you just imagine!!! πŸ˜‰

Then I saw a photo of a hare jumping down with it's head raised looking up so that it's ears were more backwards towards the body - perfect. I would apply a little artistic licence as to how far back the ears went (so they touched the body πŸ˜‰) and I was good to start making😊

In my quest to use up some part made pieces on this challenge I started out with a part made D ring that I'd been making earlier in the month while teaching. 


I got to work with a file adapting the shape and roughing it up a bit.


My little hare needed something to jump off so I made a little log and fixed it to the ring band...


...and then added some grass like texture to the top part of the ring. 


Next I made my little hare. Here he is sort of finished, but I didn't think he was quite right, then I realised I'd made his head a bit too long...


...so I carved it back a bit and reshaped it, then re-carved the nose onto it. This worked much better to me. So I attached him onto the ring 😊


All in all I was very happy with him, BUT to be fair it was not going to be the most practical ring to wear!!! I liked the idea that he could also be admired as an ornament if he wasn't being worn, so I made a little stand. 


It was very simply made from three pieces. I thought the curved legs would echo the shape of the ring shank and the top texture repeats the grass on the ring. 


The ring just sits nicely into the slot...


...and the ring can sit upright or at a slight angle so you can see the hare better. 


I then fired the ring and the stand and finished them off 😊


Now...what to name the ring. I enjoyed making this one so much I decided on

Jumping for Joy

πŸ˜‚

This wasn't the all that easy to get a good photo of, so I decided to make a little video of the ring too :D 


I've really enjoyed this months challenge and can't wait to see what August will bring us!!

Until then...

Have fun!!

Joy x

Related Posts with Thumbnails