Showing posts with label ring making workshops. Show all posts

Friday, 1 November 2019

Ring a Month 2019 - October


This is my ring for the Ring a Month Challenge 2019
Sakura

The theme for October was
Inspired by the Seasons 

I decided to go with a Spring themed ring 😀 

This month I was running it really close on time - I only started my ring on the 31st but I did manage to get some photos posted before the end of the day!! lol

First I made the topper for the ring. The lovely pink CZ pear shaped stones are 5mm x 3mm so quite tiny. 


As the ring has a Japanese feel to it I went with a weave pattern on my textured band that I thought looked like it went with it!! 😉


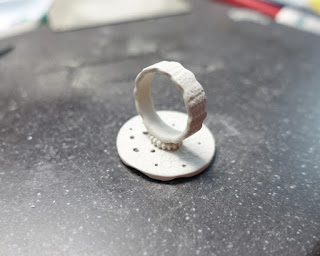
Then I carved the band so it had wavy edges.


To add more colour and sparkle I added some 2mm stones, and then I carved the edges of the topper to match in with the ring band 😃


To join the two pieces together I used a element made using the Roll Makers that I already had made. 


Finally I added a little more detail into the main blossom flower to bring the stones together more. 


Then the ring was ready to be fired!!!


I finished the ring off with more of a satin texture which I like the look of. It's not a finish that I use much but maybe I'll use it more now as I liked the effect it gave. 

One of the things I was interested to see was how the surface went during firing where the blossom was. It domed very slightly around the stones and gave a good effect.


I was very happy with how this ring turned out!!! 😀 


I think there are some nice techniques in this ring that are handy to learn including how to set round and odd shaped stones, so I'll be teaching this workshop next year at Creative Glass in Rochester, UK, on Friday 7th February 2020. 

Bookings will be open next week for the workshop!! :D

That's ten rings down in the year long challenge and only two left to do!!

Until next time...

Have fun!!

Joy x


Thursday, 17 January 2019

Ring A Month 2019 - January

I decided it was time to join a challenge again so for 2019 I've joined the Ring A Month 2019 challenge started by the lovely Anna Campbell-Hall.

When Anna first posted that she was going to do this challenge and would anyone like to join her I immediately clicked to join. It was one of those impulse things, I love ring making and I'd already decided I wanted to do some sort off challenge in 2019. It was perfect! 

I was busy thinking out what my first ring would be when Anna posted the theme for the January - which rather took me by surprise - because in all the excitement to join it turned out I'd only read the first half of her post about the challenge!!! 😄. I'd completely missed that there would be a theme for each month!! This actually was a good thing as instead of making some easy ring that just sprang to mind now I would have to do a bit more thinking - making it an even better challenge for the year.

So I got making. I didn't really have a plan so I made a plain wide band with natural uneven edges and went from there. First I added varying sized holes around the band.


I then decided it would be a good thing, over the course of the year, to try to use some of the many dried clay elements I have laying around, and I have lots!! This box has teeny, tiny bits in. I chose some textured discs of clay to fit behind some of the holes on the band.


I added them from the inside of the band to create some textured recesses. I tried to make sure every texture I used was different. One or two are similar but no two are actually the same. 


Once I'd filled as many of the holes as I wanted I drew a pattern onto the plain areas with pencil to see how it would look. I'm not a great fan of plain silver so by carving in a design I could fill up some of the area. 


I thought that looked okay so I went ahead and carved the design onto the surface using a combination of the tip of a needle file and a tiny balled headed burnisher tool. 

You can see in the recess at the front in the photo below that one of the circular textures had a little crack in it. I did debate filling the crack, but as it didn't go all the way through I left it as it was - it added more texture!!!! 😉


Um...there was still still quite a bit of plain silver left so I went with my normal filler when doing designs that I feel are a bit empty. If in doubt add some dots, they always seem to work! 😂 


Finally I did a bit of carving to the edges of the band to make it a more interesting shape.


Finished and ready for firing. It went off into the kiln and was fired at 820C for an hour plus.

After polishing the ring I used some patina to make the recesses dark and to highlight the textures. 


Here's a short video of the ring so you can see all around it. 


I quite like the outcome. I've certainly never made a ring by this method before, and I'm sure I wouldn't of done without the challenge - maybe I will develop this technique more in the future :)

Now I will patiently wait to find out what the theme for February's ring will be! 

Have fun!

Joy x


Friday, 20 November 2015

41/52 Textured Spinner Ring

This challenge piece is a spinner ring. Yes, I know I've made spinner rings before in the past but this one is different!! :D

When I've made them before I've used ready made RingCores for the outer channelled ring band, and then created my own unique inner rings. Here is a photo of some of them.


Don't get me wrong, I do think using RingCores is a great idea, but sometimes the sizes they are available in can be a bit restricting, and it doesn't leave any scope for design on the outer ring.
 
Now you know me, I do love my textures, so I decided it was time to start making the outer ring in silver clay as well. This ring is all made using Art Clay Silver, the main metal clay that I use.


I'm very excited with the result and will be making more of these very soon. Now I can have lovely textures on the sides of the ring and make the channelled ring band much more interesting. Also by making my own I've added a nice comfort fit to the ring with smooth rounded edges around the inside of the ring band. The inner band on this ring is set with 2mm lab sapphires. 
 
I made a short video so you can see the ring 'in action'!!! It spins beautifully - in fact better than any of the ones I've made so far!
 
 
This is a new one day workshop I'll be teaching so if you want to make your very own unique ring let me know! :D
 
Have fun!
 
Joy x


Tuesday, 14 July 2015

22/52 Marchionesque

A Ring! 
Yes, I know I make lots of rings, but this one is a bit different. It is something that was on my challenge list for the year and it's all about the stone setting.


I've been wanting to make more large stone rings so this is just the first one, but also to start adding stones around the setting. I was really pleased with how this turned out.

The blue stone is an 8mm lab zircon and it is surrounded by 6 x 2mm lab rubies. I decided to carve the sides of the setting as well and was really pleased with the effect - the silver sort of looked quilted around the sides.

As it happened this one fitted me perfectly! ;) Unfortunately I decided to put it out for sale at my show last weekend and sold it immediately though!! So I'll have to make more along these lines now!

The texture around the band is one of my own designs. They will be for sale soon!!

Have fun!

Joy


Tuesday, 29 July 2014

New Work

 I've been having fun over the past few months making lots of different types of work.

These are a few rainbow enamelled pieces. I do love adding colour with enamel!! :)


Ive also been making lots more rings. No enamel on these ones, but still some colour on most of them (of course!) :D

The weather has been really hot over the last few days, but today it is cooler which is great as I plan to get enamelling.

So, it is kiln on and time to finish up a locket (or maybe two!!) that I have been working on. 

Photos tomorrow hopefully!  :)

Have fun!

Joy x
Related Posts with Thumbnails