Showing posts with label jewellery workshops. Show all posts

Sunday, 29 December 2019

Ring a Month 2019 - December


This is my ring for December for the Ring a Month Challenge 2019.

This is 
Jimbug © Joy Funnell

The theme for the month was Creatures.

This is quite a long winded post - you have been warned!! 😉

When I started on this challenge in January 2019 one of my personal things was to try to use left over elements that I have already laying around. I've managed this with varying success over the months. This month I'm pleased to say that apart from the ring band all the elements were pre-made pieces of clay I had laying around 😀

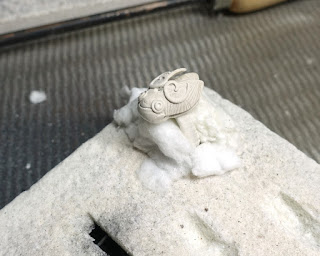
There's a little story to the main element that sparked my idea for this ring. In November I was teaching a 1-2-1 workshop and we were making Christmas decorations. The main thing to be made was a teddy bear (which was very successful I would add), but during the day I was playing with one or two other ideas my workshop attendee had had while she was working on teddy. One was a snowdrop. I made a little template up and cut out a piece of textured clay to form into a flower shape. In the process of mucking about with it I laid it down and we both said - oh look - a cricket!! 😂

I left it on one side to dry as the shape was quite nice. 

When the theme for the December ring was announced I immediately thought of the little bug shape. 


All year through this challenge I've wanted to do at least one ring with a cabochon (cab) in it. 

I've had this ammolite cab for ages - it has gorgeous colours but the finish is not top quality - there again I was given it as a freebie with some other stones I bought so I can't complain 😉 

I realised it was a perfect size and shape for my little bug so I set about creating!!


In order to fit the cab into the wing shapes so it could be the body of the bug the first thing I did was to remove the bottom 'petal'. Then I found an old piece of textured clay I could make a base from. It was quite big...


...and had been used for practising creating textures on various workshops in the past on the reverse!!! As that side wouldn't be seen that didn't matter. I laid the wings onto it, drew out the rough shape I wanted and then scored the clay. 


After scoring it was easy to gently bend the clay and break away all the excess, much quicker than cutting it back or filing 😊


I fixed the wings to the new base and dried it...


...and then added the original 'petal' base plate back in as that would be the support for the cab to sit on.


From my box of dried bits of clay I found two pieces for eyes and some curly bits!! lol


These were added and my little Jimbug was starting to come to life 😊


The textured surface of the head suggested a natural little smiling mouth so I just went with it and emphasised it more. 

He was very cute sitting on my fingers 😂


Now I needed a ring band. I didn't have one made in my size so I had a good think of something different I could do. I rolled out a snake of clay using the Rollmakers (if you previously missed seeing what Rollmakers are check out this blog post 😉).
After rolling the snake I then flattened it to a thickness of 2mm (8 cards). It gave a nice effect and I'll use this again. I wrapped it onto a ring mandrel and joined the ends. 


I neatened the join and then added little Jimbug onto the band.


Once he was nice and dry he was already for firing. I like to fire rings with large topper elements standing upright supported by a bit of fibre wool.


Once he was fired and cooled I used pliers to adjust his wings so the cab would easily slide into place. 


I polished up the silver and patinated it to give a nice contrast in the textures and make them stand out. 
 

Finally I set the Ammolite cab into place. To be sure it would be really safe I used a little glue under it and then I gently bent the wings in tightly to hold the cab in place. I don't think the cab would of fallen out without the glue but it would of wobbled a bit and I wanted it to be nice and firmly in position. 

And so Jimbug was finally ready!!


Depending on the angle of the light the Ammolite cab shines reds, yellows and greens. 


I've made a little video of him to give you a better idea of the colours in the cab 😀


So that's it - the twelfth ring!!! 

I've really enjoyed this challenge and I've definitely made some pieces I would never of dreamt of back in January.

I was thinking of what to do next year and a couple of weeks ago (after I had already started making this piece) I had an idea to start a challenge to
Set a Cab a Month in 2020.

I've created a Facebook group for that and asked if anyone wanted to join me - and we already have nearly 250 members!! Wonderful 😊

This ring is the perfect crossover from making a Ring a Month to getting ready to start my Setting a Cab a Month challenge. Please do join in next years challenge if you want to :D

So until next time...
Have Fun!!

Joy x


Wednesday, 27 November 2019

Ring a Month 2019 - November


This is my November ring for the Ring a Month Challenge 2019.

The theme for the month was Gemstones.

This is 
Rainbow Doughnuts 😁

Why Doughnuts I hear you ask??
Well I'd bought some super whizzy new moulds for making tiny embellishments and this particular mould makes little open circles. In talking to someone about them they said I could make lots of baby doughnuts!! lol It seemed like a good name to use!!😉

The moulds are made by Cool Tools in the USA (so they are molds and not moulds - lol) and are available here in the UK from Metal Clay Ltd  (at which point they become moulds!!!). 😂

First of all I made a load of little embellishments using Art Clay Silver 999. The clay is pressed into the mould and left to dry. Then the little shapes can be popped out. 


Then I made a flat ring band. As I hadn't really worked out my design in advance I went with a very wide band...


...then I played around with the doughnuts until I found a design I liked. Of course if I had done this part first I could of made the band the right size to start with, but hey, why make life easy 😉


I carefully measured up and worked out that the design should fit quite nicely around the ring so then I started to add the doughnuts to the flat band. I used water to join them...


...and continued around the ring - and it worked out right!! Phew! 😌


Then I started to remove all the excess silver clay...


...working around both edges of the ring first with a scalpel.


I used files and baby wipes to refine the design close to the edges of the doughnuts and neaten it all up. 


Next was choosing which stone colours to use. I LOVE this bit!!! 😊 Should I go with the small stones in differing colour pairs or..


....the same in each pair. I liked this second option better. The stones are 2mm and 4mm and are a mix of lab grown, nano and CZs. They are all fire-able. 


I drilled out the centre of each doughnut and used stone setting burrs to make the seat for each stone.


Arguably I could of made this ring using my usual method of creating stone settings, but I like that each setting is rounded on the top so this does give a different look. 

I set all the stones into place


Lots of different colour combos


all around the band 😊


I was pleased with the end result. 


Turned out it wasn't the easiest ring to photograph though!! lol


So now we have made 11 of the 12 rings for the year long challenge.

Only 1 ring left to go!!!


Have fun!

Joy x

Wednesday, 6 February 2019

Ring a Month 2019 - February

The theme announced for February for the Make a Ring a Month Challenge was MUSIC & LYRICS. This was a very open theme to be interpreted in any way we wanted to.

It didn't take me too long to decide that I wanted to represent a song and I had an idea for what! 

So, a little side waffle first!! 😉 If you read my RAM January blog post then you'll know I signed up for this year long challenge without properly reading all the info, so I was somewhat taken aback when the first theme was announced as I hadn't realised there was going to be themes!! 😂 Anyway...before the January theme was announced I'd actually had an idea for a ring to make, but then I decided it didn't really fit January's theme. 

I realised that ring would be perfect for the February theme as it fitted a song from an album I've always loved. The idea for making the ring came to me while watching BBC Bargain Hunt (a programme about buying antiques and collectables then selling them at auction) . One of the items was an old wooden paddle with a carved chain link style design along the shaft of it. 
I sat there watching thinking I'm sure I could do that in silver clay. Frustratingly I can't find an image of what I saw to show you, I've tried a lot of online searching but given up. You'll have to take my word on this :)

I worked out the way the link design was made was actually really easy to do. 

I started out making a plain D ring shaped band in silver clay. OK, so I forgot to photograph that bit 😉 Just imagine a plain D ring here...

Then I marked up where each link would be with a pencil and carved a groove for the end of each 'link'. 


I carved out on each side of the centre top 'links' to get the shape....


...and evened it up a bit around the ring...


although a bit of wonkiness always adds some character 😏 ...


..then I neatened it all up a tad more.


Next came the refining. For this I used baby wipes.
The aim was to round off the edges of each
'link' so they started to look like they went though each other...


...and I worked my way around the whole ring, stopping to dry every now and then (the ring, not me! 😃 ) The baby wipes add moisture as I work so care is needed not to make the clay too soggy. 


Finally it started to look more like a chain link design 😁


And then I fired it, polished it and patinated it.


I was quite pleased with the result - I think it does look like chain link!
An unending chain of love.

It's quite a narrow ring and is very comfortable to wear.


Here's a short video to give you a better idea of the unendingness ...


...oh, and the song that inspired it...

'I can still hear you saying
You would never break the chain.'

'Chain, keep us together...'

Yes, I'm sure you've guessed by now!!! ;)

From the Album Rumours by Fleetwood Mac
The Chain


I've really enjoyed trying something totally new to me for this ring.

My plan of using up some of my spare clay elements that I have laying around went totally out the window for this ring - but never mind 😇

Until next time...
Have fun!

Joy x


Sunday, 19 June 2016

Workshops in the USA 2016

 
I am so excited to tell you that we are now all set for my workshops in the USA!!!
 
This is the only time I'll be teaching in USA this year so don't miss out :D
 
First I'll be teaching a two day workshop on the 15th and 16th October.
This is my new Hidden Lantern workshop.
 
One side has your own unique silver texture that is enamelled and decorated with 2mm stones...
 
 
 the other side is pierced and you have the option to add keum boo inside so the gold shines out!!!
Oh, and did I mention that we have a lovely radiating carved design top???

 
This is a technique packed 2 days and not for the faint hearted ;) But hey, you know me , I love to keep everyone working...with a good sprinkling of laughter and fun included of course!! :D
 
Then to follow on why not join me for my
Joyful Spinner Rings workshop.
This is on 17th October so you can make it a long weekend of creativity!!
 
 
These are super fun!!
We'll cover making them the right size (yes I know, that can be such a hassle!!!) and you'll make everything in silver clay.
 
The outside ring is textured and yours will be uniquely you as you'll create your own design around the edges. Of course we'll make sure everything is super smooth and beautifully tactile to feel and wear too.


The inner ring will spin freely and of course it will need some colour (doesn't everything???) so we'll be adding 2mm fireable stones.


Here's a spinney video ;)


These are just some ideas, I've already made other rings (watch out for more photos!). This technique is so versatile!
 
So... you've made it this far through my post???
 
Where are these workshops I hear you asking!!! ;)
 
Just near Washington DC at La Ruche Davis with the most excellent Ann Davis as host!!!
Check out all the details and how to book here.

A workshop at Ann's is always a good laugh, and don't miss out on her included Saturday night GF buffet and wine social if you book the 2 day workshop. I always love this bit with super people dropping in to join us too!! :D
 
I'm looking forward to seeing old friends and meeting new ones :D
 
Have Fun!!!
 
Joy
 
PS Feeling left out as you are in Europe?? I'll be posting about a wonderful workshop in Folkestone UK in November this year in my next blog post tomorrow! Don't miss it!!
 

Related Posts with Thumbnails