Sunday, 22 November 2015

43/52 Mini Moon Flask


One of the first things I made on this year long challenge, it was way back in January, was a moon flask. I've made several more since and I teach making these in my Porcelain Illusions / Joyful Moon Flask workshops. 

I love the shape of these moon flasks and decided to revisit the making of them and have a go at a miniature one! It is all made in silver like the bigger flasks, but I've developed a slightly different technique for making it :D

Each side is enamelled...

...and it has a little stopper so you could use it for perfume. The stopper on this one is set with a 4mm faceted rainbow moonstone cabochon. I think it looks a bit like rock crystal. I chose it because it seems to suit the different colours on each side of the flask. 

 
The round main body of the flask measures just 18mm in diameter. 
 
Here it is with one of its 'big brothers' to give you a better idea of the sense of scale...


...and in my hand. 


Cute isn't it! :D

If you want to make a Moon Flask do get in touch! :) 

Have fun!

Joy x

Friday, 20 November 2015

42/52 Modern Medieval Cluster Ring


I'm liking this one - it's slightly too big for me though (maybe I should just make all rings my size in case I want to keep them!). Still, I think I will be making more in this style so next time... ;)

I made one large stone ring earlier in this challenge, but this ring is by far the biggest stone set ring I've ever made!! It is silver and the centre stone is a 6mm amethyst CZ. The surrounding stones are 4mm lab rubies and lab sapphires.
 
Whilst it is large it actually seems to sit quite nicely. I know I could wear it no problem (if it was a smidgen smaller)! In fact I'm wearing it as I type and the stones are super sparkly and catching the light :)


I've called this a Modern Medieval Cluster Ring. I was aiming for a medieval/tudor-ish sort of look - did I succeed?? I used one of my own textures around the ring band and on the back of the stone setting.


I have two more challenge pieces nearly finished so there'll be more posts in the next few days...and part 2 of Japan! :D

Have fun!

Joy

41/52 Textured Spinner Ring

This challenge piece is a spinner ring. Yes, I know I've made spinner rings before in the past but this one is different!! :D

When I've made them before I've used ready made RingCores for the outer channelled ring band, and then created my own unique inner rings. Here is a photo of some of them.


Don't get me wrong, I do think using RingCores is a great idea, but sometimes the sizes they are available in can be a bit restricting, and it doesn't leave any scope for design on the outer ring.
 
Now you know me, I do love my textures, so I decided it was time to start making the outer ring in silver clay as well. This ring is all made using Art Clay Silver, the main metal clay that I use.


I'm very excited with the result and will be making more of these very soon. Now I can have lovely textures on the sides of the ring and make the channelled ring band much more interesting. Also by making my own I've added a nice comfort fit to the ring with smooth rounded edges around the inside of the ring band. The inner band on this ring is set with 2mm lab sapphires. 
 
I made a short video so you can see the ring 'in action'!!! It spins beautifully - in fact better than any of the ones I've made so far!
 
 
This is a new one day workshop I'll be teaching so if you want to make your very own unique ring let me know! :D
 
Have fun!
 
Joy x


Wednesday, 18 November 2015

40/52 Japan - Part 1

 Time to catch up on my blog and my annual challenge! 

I have several pieces nearly finished - but first I want to tell you about my amazing trip to Japan!. This is part one - yes there will be a part two very soon! I decided that it was all so wonderful it warranted two entries in my challenge! I hope you agree :)

The flight to Japan is around 12 hours from the UK so by the time I arrived I was already feeling a little weary having not slept on the plane. I had a couple of hours to wait for the bus transfer and I have to say Haneda airport in Tokyo is an excellent place to plane watch! I arrived at my hotel before noon, left my luggage ready to check in later and headed straight out to see some of the surrounding area. The hotel staff told me the easiest way to where I wanted to go was through Ikebukuro railway station - um... it is the second busiest station in the world!  Actually navigating it wasn't too bad, I found my way without getting lost! On returning to the hotel I found they had upgraded me for free - how nice!!! I was on the 22nd floor of the hotel and had a lovely view out across Tokyo - day and night!

Then I headed out again to find the exhibition of all the work from the Silver Accessories Contest 2015. The first surprise was when I saw the poster for the exhibition! Wow - how good is this - very me with all those lovely colours!!!
 
The venue for the exhibition was stunning, and looked great in the dark....

...and  all the entries were wonderful to see. The quality of the work was just amazing and very inspiring!! I really did feel a bit stunned and very honoured that all four judges had chosen my piece for the Grand Prix Award!!

Next day I met up with Dice Minagawa from Aida for a day of sightseeing and shopping! We started off back at the exhibition for another look and a few photos (photography was not allowed in the exhibition so I was very pleased to have these taken for me!). That poster again (of course!) at the entrance to the gallery...

 ...and inside the exhibition by my piece!!! :D


Then we headed off out across Tokyo to go to the jewellery area first. It wasn't long before I had purchased quite a few lovely jewellery tools and supplies (wonderful mini hammers!) and some beautiful turquoise and amethyst beads. 

The fish markets were so colourful. I really didn't fancy the red snapper eyes though which are apparently a delicacy!!!!
After seeing all that fish we had to have a fishy lunch!
Lots of beautiful fresh raw and cooked fish, pickles and rice...and we even cooked our own giant clam on the grill on our table! 
It was a very colourful place and I thought it was quite old, turned out it is a modern chain based on the old fishing village eateries! Oh well :) It looked the part and was very atmospheric!


I found it really interesting how the shops are grouped in areas in Tokyo. After the jewellery supplies  we went to the kitchen supplies area (loads of interesting things there!) and then the road where all the shops sell every kind of food dish you can imagine all made out of wax that all the restaurants use in their windows (it's all incredibly realistic!). We saw shops full of pottery and others selling masks! (Oh yes, more on masks in another post! ;) )
 

 So much to see...
This restaurant specialised in Fugu (puffer fish). Parts of the fish are highly toxic and they must be prepared by licenced chefs only - we didn't try it!
 
Finally we arrived at Asakusa - a large temple complex in Tokyo. My plan was to revisit that area on the Monday to explore further.
When I arrived back at my hotel this coach was parked outside - it seemed to sum up the day perfectly! :D
 

Day 3 was the main reason for my visit to Japan - the Silver Accessories Contest 2015Award Ceremony!

It started off with the official ceremony at 1pm that lasted about an hour. Lots of the award winners were there and it was wonderful as each person went on stage to receive their prize. I was last on and the only one giving a short speech, and I have to say as it drew nearer I started to feel a little bit nervous! When it came to it I think it was all fine though :)

I received my certificate, award and prize...here is Mr Aida reading my certificate before presenting it to me...
...and then I did my speech which Dice translated (no, I didn't have to do it in Japanese!).
 
Next we had the official photos taken, these photos were all taken for me on my camera (thank you Mark!).
 
After that it was time for everyone to enjoy themselves at the reception with a lovely buffet meal. I met lots of delightful people, so many excellent metal clay artists and everyone wearing their fantastic creations as well!

To be continued...!!!

Meanwhile..

Have fun!

Joy x


Sunday, 18 October 2015

39/52 Flower Chain


I really enjoyed making this necklace!

When I made my necklace 'Precious' (below) I added some small enamelled links into the chain. It was the first time I had made enamelled links like that and I really liked the result. I realised they would make a lovely necklace on their own.


So I decided to make some flower links. Here they are made and being enamelled. First I enamelled the black and green on each link. Black and green are both nice safe enamel colours that will not overfire so that is why they go on first. Then I enamelled the other colours.


You can see from the photos that I started off with six links. Now an even number of pieces is not generally considered very good in design so why did I make six? Not sure really, but in the back of my mind I think there was a vague idea of enamelling the flowers one of each colour...red, orange, yellow, green,blue and purple. Of course that changed!

I had already tried the links together as six and I sort of knew I should only really use five, but as I'd made six that was what the necklace was going to be.

Then serendipity stepped in!!! While I was enamelling the blue flowers I managed to forget to set the timer for one link! It ended up in the kiln for FAR too long!!! The end result was the turquoise enamel started to slightly overfire in the centre.


The link wasn't ruined...but no longer matched the others - so that was that. The necklace was obviously only ever meant to have five links!! A happy accident! :D 
Don't you just love fate!!! 
The little link above will make it's way into a delicate small necklace some time.


I finished the chain with some handmade twisted silver links and a silver toggle and clasp. I'm pleased with the outcome and I'll be making more necklaces like this in due time.

I'll also be teaching how to make your very enamelled link chain in a workshop next year! Watch out for more details soon :)

Meanwhile...

Have fun!

Joy x


Saturday, 17 October 2015

38/52 Extruding Fun!


This next challenge is all about some playing...oh sorry...that should be testing!!... that I've been doing with the new 3DMetalCreator from the very inventive and knowledgeable Bill Struve. 

This wonderful setup is powered by CO2 gas and is very simple and easy to use. You have a gas canister with a regulator, a foot pedal and at the end of the tubing you attach a syringe filled with bronze clay. When you put your foot down on the pedal the clay comes out the syringe so there is no effort on your part involved in extruding the syringe, and you have excellent control. 

These pieces in the photos were the very first pieces I made using it. I love how you can get all lots of different results depending on what size nozzle you use. 


This little bronze critter was so quick to produce and he is hollow inside. The clay is designed to be quite firm so you can build up with it in layers. 

Here he is fired - OK he'll never win a beauty contest but it was so easy to make him! 

One of the things I found I really liked was using a flattened nozzle. The background of this piece was made using that nozzle and then a fine nozzle for the design on top. 

 Now this was my absolute favourite thing! Using the flat nozzle to extrude these shapes. No way could I do this is I was using hand pressure to extrude the clay. Making wavy designs with the syringe was just a doddle though :)


This piece was made as four separate lengths and then joined before firing. The clay bonded with just some water to join it. 


Bill designed the 3DMetalCreator to be used with a refillable 20oz CO2 cylinder. If you have paintball places near to you that is probably no problem. As I found it difficult to get my cylinder filled he suggested I tried a disposable 90gm canister with an adapter. I found I could buy them no problem and the set up worked well.

The 3DMetalCreator is an ongoing project and today a Kickstarter has been launched. I think there is a great future for this.

Bill has been creating large scale pieces. For me I find it fascinating trying the possibilities of intricate small scale work and I'm very excited at the prospect of using this with silver in the future.

Do check out the Kickstarter campaign - you'll find loads more info!!

Have fun!

Joy x

PS My textures are now back in stock on my website :D

37/52 Joyful Angels


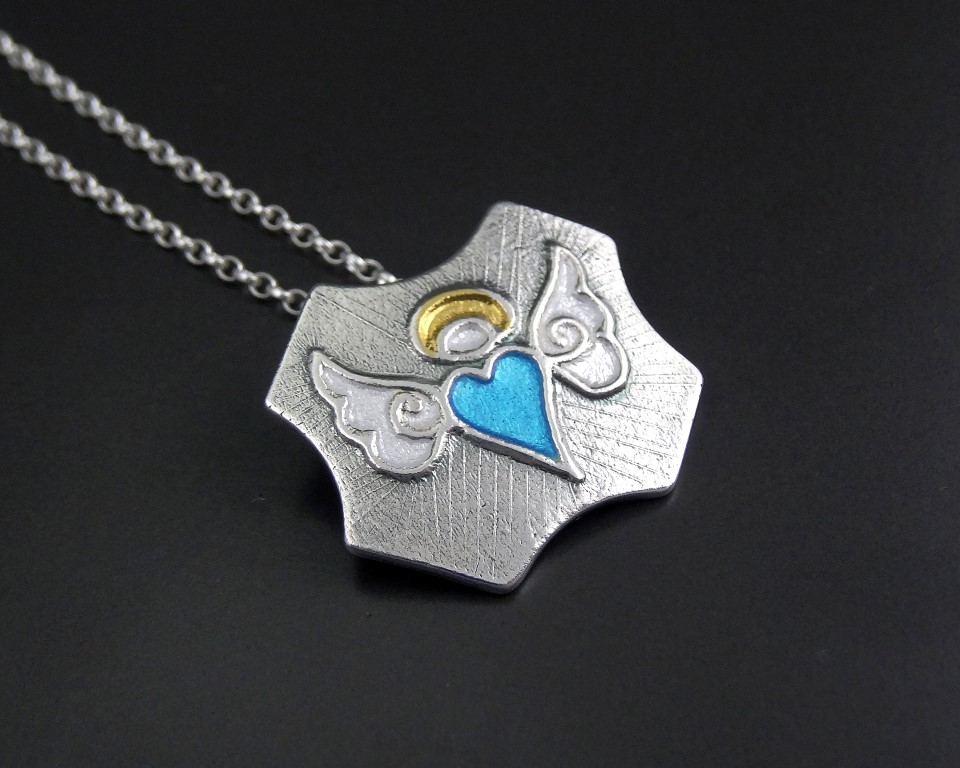
I know it still October, and I hate to even mention it, but I've been thinking ahead to Christmas! A while ago I designed an angel pendant and I wanted to revisit it to make some more for a Christmas photo that I needed to do now.

I decided to make three angels in three different colours - then I hit much indecision as to what shape to make each pendant! So I went for three different shapes as well! :)

I actually still can't decide which I like best. Do let me know your thoughts on it.

The first angel has a lovely turquoise blue heart...and I'm not sure what this shape is called!


I used one of my own textures on the back of each pendant and this one also has a nice sparkly blue zircon stone.
 

The next angel is on a heart shape pendant...and of course it had to have a red heart as well :)
 

The back of this one has a nice sparkly red cz.
 

Finally the third angel has a vibrant green heart and is on a shield shape pendant.


 I decided to go with a lovely pale yellow citrine cz on the back of this one.


Each angel has 24k gold on their halos which I fused to the silver using the keum boo technique. There is a very subtle radiating pattern in the silver around each angel.  

I've now taken the special photos that I wanted so I've listed the angels on website ;)

Do let me know what you think by leaving a comment :)

Have fun!

Joy x 

PS I'm on catch up - two more blog posts coming soon! 
PPS I now have more of my textures back in stock on my website!


Related Posts with Thumbnails