Sunday 18 October 2015

39/52 Flower Chain


I really enjoyed making this necklace!

When I made my necklace 'Precious' (below) I added some small enamelled links into the chain. It was the first time I had made enamelled links like that and I really liked the result. I realised they would make a lovely necklace on their own.


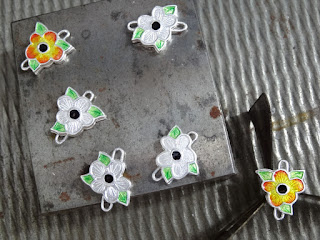
So I decided to make some flower links. Here they are made and being enamelled. First I enamelled the black and green on each link. Black and green are both nice safe enamel colours that will not overfire so that is why they go on first. Then I enamelled the other colours.


You can see from the photos that I started off with six links. Now an even number of pieces is not generally considered very good in design so why did I make six? Not sure really, but in the back of my mind I think there was a vague idea of enamelling the flowers one of each colour...red, orange, yellow, green,blue and purple. Of course that changed!

I had already tried the links together as six and I sort of knew I should only really use five, but as I'd made six that was what the necklace was going to be.

Then serendipity stepped in!!! While I was enamelling the blue flowers I managed to forget to set the timer for one link! It ended up in the kiln for FAR too long!!! The end result was the turquoise enamel started to slightly overfire in the centre.


The link wasn't ruined...but no longer matched the others - so that was that. The necklace was obviously only ever meant to have five links!! A happy accident! :D 
Don't you just love fate!!! 
The little link above will make it's way into a delicate small necklace some time.


I finished the chain with some handmade twisted silver links and a silver toggle and clasp. I'm pleased with the outcome and I'll be making more necklaces like this in due time.

I'll also be teaching how to make your very enamelled link chain in a workshop next year! Watch out for more details soon :)

Meanwhile...

Have fun!

Joy x


Saturday 17 October 2015

38/52 Extruding Fun!


This next challenge is all about some playing...oh sorry...that should be testing!!... that I've been doing with the new 3DMetalCreator from the very inventive and knowledgeable Bill Struve. 

This wonderful setup is powered by CO2 gas and is very simple and easy to use. You have a gas canister with a regulator, a foot pedal and at the end of the tubing you attach a syringe filled with bronze clay. When you put your foot down on the pedal the clay comes out the syringe so there is no effort on your part involved in extruding the syringe, and you have excellent control. 

These pieces in the photos were the very first pieces I made using it. I love how you can get all lots of different results depending on what size nozzle you use. 


This little bronze critter was so quick to produce and he is hollow inside. The clay is designed to be quite firm so you can build up with it in layers. 

Here he is fired - OK he'll never win a beauty contest but it was so easy to make him! 

One of the things I found I really liked was using a flattened nozzle. The background of this piece was made using that nozzle and then a fine nozzle for the design on top. 

 Now this was my absolute favourite thing! Using the flat nozzle to extrude these shapes. No way could I do this is I was using hand pressure to extrude the clay. Making wavy designs with the syringe was just a doddle though :)


This piece was made as four separate lengths and then joined before firing. The clay bonded with just some water to join it. 


Bill designed the 3DMetalCreator to be used with a refillable 20oz CO2 cylinder. If you have paintball places near to you that is probably no problem. As I found it difficult to get my cylinder filled he suggested I tried a disposable 90gm canister with an adapter. I found I could buy them no problem and the set up worked well.

The 3DMetalCreator is an ongoing project and today a Kickstarter has been launched. I think there is a great future for this.

Bill has been creating large scale pieces. For me I find it fascinating trying the possibilities of intricate small scale work and I'm very excited at the prospect of using this with silver in the future.

Do check out the Kickstarter campaign - you'll find loads more info!!

Have fun!

Joy x

PS My textures are now back in stock on my website :D

37/52 Joyful Angels


I know it still October, and I hate to even mention it, but I've been thinking ahead to Christmas! A while ago I designed an angel pendant and I wanted to revisit it to make some more for a Christmas photo that I needed to do now.

I decided to make three angels in three different colours - then I hit much indecision as to what shape to make each pendant! So I went for three different shapes as well! :)

I actually still can't decide which I like best. Do let me know your thoughts on it.

The first angel has a lovely turquoise blue heart...and I'm not sure what this shape is called!


I used one of my own textures on the back of each pendant and this one also has a nice sparkly blue zircon stone.
 

The next angel is on a heart shape pendant...and of course it had to have a red heart as well :)
 

The back of this one has a nice sparkly red cz.
 

Finally the third angel has a vibrant green heart and is on a shield shape pendant.


 I decided to go with a lovely pale yellow citrine cz on the back of this one.


Each angel has 24k gold on their halos which I fused to the silver using the keum boo technique. There is a very subtle radiating pattern in the silver around each angel.  

I've now taken the special photos that I wanted so I've listed the angels on website ;)

Do let me know what you think by leaving a comment :)

Have fun!

Joy x 

PS I'm on catch up - two more blog posts coming soon! 
PPS I now have more of my textures back in stock on my website!


Related Posts with Thumbnails